#

In this article, you will learn how to isolate and manage project dependencies in a self-contained environment while automating the setup process using direnv and Poetry for seamless developer experience
Pre-Requisites
Poetryinstalled (if not,brew install poetry)Direvnvinstalled (if not, brew install direnv)- An existing project that uses poetry for dependency management OR a requirements.txt file OR just an idea
- Optional: a
pyproject.tomlorrequirements.txtfile to start off with
Read Before Instructions:
💡 You can copy the exact .envrc and env code below into any future project that uses Poetry.
Poetry Init
- This command starts an interactive guide to set up your
pyproject.tomlfile. - When asked, you can skip adding dependencies here if you plan to import them from
requirements.txt(see X).
Poetry config virtualenvs.in-project true
- This creates a .venv/ folder inside your project directory for easier management and portability.
Let’s say you want to clone a project that uses Poetry and you already have poetry installed
Let’s say you want to clone a project that uses poetry, like my Beehive Metadata Tracker. Here’s how you would do that:
START BY
Cloning the repository of interest
git clone https://github.com/dagny099/PyMesh.git
OR
Make a new project at the terminal
mkdir FUN_NEW_DATA_PROJECT
Step-by-Step Instructions:
-
Specify project dependencies:
poetry initThis sets up the virtual environment and installs any dependencies listed in
pyproject.toml.
Step 1) Create your project & Install any poetry dependencies (if known):
cd beehive-tracker
poetry init
poetry config virtualenvs.in-project true
poetry install
You may get a warning about needing to get package-mode=false if that’s not set in the pyproject.toml file — if so, just add it:
[tool.poetry]
package-mode = false
If the project has a “requirements.txt” you can add it to the environment this way:
grep -Ev '^\s*(#|$)' requirements.txt | while read -r pkg; do
  poetry add "$pkg"
done
You can review the pyproject.toml file afterwards to ensure the dependencies were written into the file, as well as writing poetry.lock (which keeps track of the package versions).
Step 2) touch .envrc
From Terminal, run touch .envrc to create the file & add the code below (nano .envrc):
VENV_PATH=$(poetry env info -p)
source "$VENV_PATH/bin/activate"
dotenv
Step 3) touch .env
From Terminal, run touch .env to create the file & run these commands:
echo ".env" >> .gitignore
Step 4) direnv allow
🎉 Now: Environment fully auto-activated, env variables loaded — clean, and predictable.
To test, close Terminal or navigate away from directory — You should see direnv: unloading
Return to the project directory — You should see direnv: loading .../.envrc
👉 Adding dependencies in Poetry
This will:
- Install the package into the current virtual environment
- Update your
pyproject.tomlandpoetry.lockin one go
🔒 The lock file ensures reproducibility across machines.
⚠️ Don’t install manually with pip install in a Poetry project — you’ll bypass the lockfile and your pyproject.toml won’t know about the new dependency.
👉 Using Jupyter with kernel of project environment
Using Jupyter with Project Virtual Environments
| Step | Unix / macOScommand | Windows CMD↔PowerShell |
|---|---|---|
| 1.Create the env | python -m venv .venv |
python -m venv .venv |
| 2.Activate it | source .venv/bin/activate |
.\.venv\Scripts\activate/.\.venv\Scripts\Activate.ps1 |
| 3.Add kernel bits(only once per env) | pip install ipykernel |
pip install ipykernel |
| 4.Register the kernel | python -m ipykernel install --user --name project_env --display-name "Python (project_env)" |
same |
That’s it! Now launch Jupyter (jupyter lab or jupyter notebook) and select Python (project_env) from the kernel list. Each project remains isolated because:
- Only packages inside
.venvare visible when you activate it. - Jupyter simply points to that interpreter; different notebooks can be backed by different envs without clobbering each other.
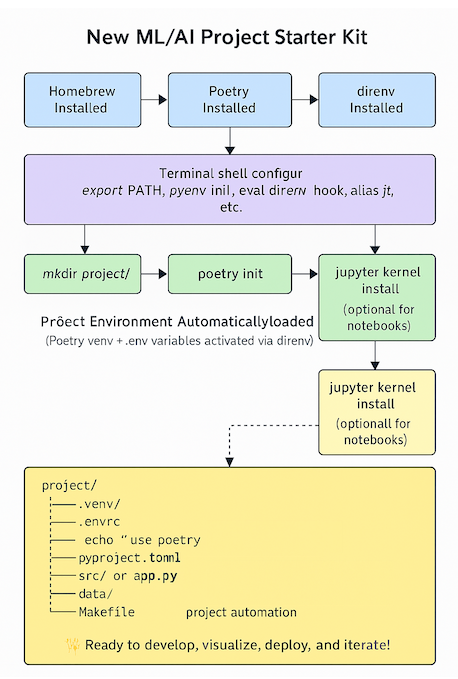
Your Toolkit Should Be Layered Like This
Tips to Keep Your Workflow Clean
1. ✅ Use poetry config to customize behavior
For example, if you want poetry venvs to live inside the project folder instead of .cache, you can do:
poetry config virtualenvs.in-project true
This creates a .venv/ folder inside each project — easier to inspect and control.
2. 🛑 Never install tools like Docker, GitHub CLI, Poetry, VS Code extensions inside a virtualenv
- Keep those global (managed by Homebrew or system packages)
- Keep project dependencies (pandas, scikit-learn, openai, streamlit, etc.) inside Poetry-managed environments
3. 🎯 Set up direnv to automatically activate Poetry environments
Inside your .envrc:
use poetry
This tells direnv: “Hey, this folder uses Poetry. Go activate the right venv for me.”
Don’t forget to run:
direnv allow
And now any time you cd into that folder:
- It runs
poetry shellbehind the scenes - It loads any
.envfile you’ve defined - You don’t have to remember anything
Conclusion: Your Python Project Environment is Ready
By following this starter kit, you’ve learned how to:
- Create isolated Python environments with Poetry for clean dependency management
- Automate environment activation using direnv for a seamless workflow
- Integrate Jupyter notebooks with your project-specific environments
This structured approach ensures your data science projects remain organized, reproducible, and deployment-ready from the start. The combination of Poetry, direnv, and proper project configuration and isolation creates a foundation that scales well from local development to production.
Remember that good project structure is an investment that pays dividends throughout the development lifecycle. By taking the time to set up these practices now, you’ll save countless hours troubleshooting environment issues and deployment problems later.
🚀 Coming Soon: Cloud Deployment Mastery - Learn how to deploy your data science applications to AWS EC2 and create professional, custom subdomains that impress clients and users. From server setup and security best practices to domain configuration and SSL encryption - our next guide will transform your local projects into production-ready web applications that anyone can access. Stay tuned!
Happy coding!